
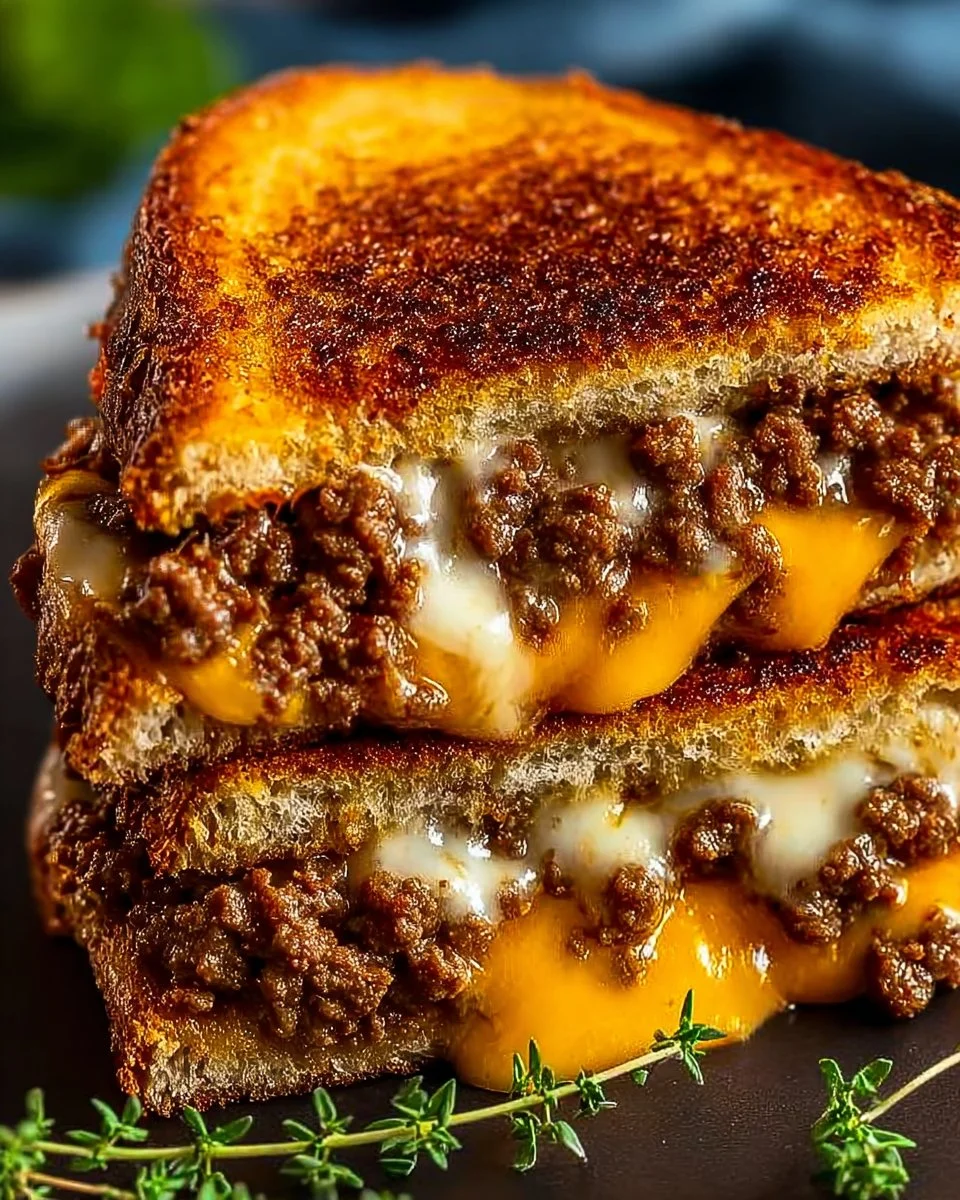
There’s something truly special about biting into a perfectly melted, cheese-laden sandwich that oozes comfort and satisfaction. The Ultimate Cheesy Ground Beef Melt is just that – a glorious combination of beef, onions, and melted cheese nestled between perfectly toasted bread. It’s a delightful marriage of flavors and textures, with the savory beef contrasting beautifully against the indulgent melt of cheese. This dish has become a staple in my kitchen, especially when I need a quick fix for my cravings or when friends drop by unexpectedly!
This recipe comes together surprisingly fast, making it perfect for bustling weeknights when I want something both comforting and delicious without spending hours in the kitchen. It’s incredibly versatile, too; whether you’re serving it for a casual lunch, a game night gathering, or even a cozy dinner, it fits right in. And let me tell you – the leftovers, if there are any, are just as delightful the next day.
Why I Love Ultimate Cheesy Ground Beef Melt
The Ultimate Cheesy Ground Beef Melt hits that sweet spot between ease and indulgence. It’s incredibly easy and undeniably delicious, with each bite packed with flavor and heartiness that satisfies my cravings every time. Plus, it’s a true winner at my table, whether I’m serving it for myself or showing off my culinary skills to friends!
Ultimate Cheesy Ground Beef Melt Ingredients
The magic of this Ultimate Cheesy Ground Beef Melt truly lies in its simplicity and the incredible flavors that come together. Each component plays a vital role in creating this mouthwatering dish. Don’t worry about exact measurements just yet; those are all in the recipe card for you!
Core Ingredients and Their Roles
- 1 POUND GROUND BEEF: This is the foundation, bringing rich and savory flavor that makes this melt satisfying.
- 1 ONION, CHOPPED: These little gems add sweetness and depth, perfectly complementing the beef.
- 2 CLOVES GARLIC, MINCED: Garlic elevates the entire dish with its aromatic magic.
- 1 TABLESPOON WORCESTERSHIRE SAUCE: This little ingredient packs a mighty punch of umami goodness!
- SALT AND PEPPER TO TASTE: The essential seasonings that enhance all the other flavors.
- 8 SLICES OF CHEESE (e.g., CHEDDAR OR AMERICAN): The stars of this melt, they create that luscious, gooey texture we crave.
- 4 SLICES OF BREAD: Perfectly toasted, they hold everything together while adding a delightful crunch.
- BUTTER, FOR SPREADING: A layer of butter brings a rich finish and helps achieve that golden-brown crust.
Substitutions and Tips
Need a swap? If you’re out of ground beef, ground turkey can work just as well, though it won’t be quite as rich. Want to switch things up? You can try swapping the cheeses; pepper jack offers a nice kick, or even a mix of cheeses can add a fun twist.
Looking to sneak in some veggies? Toss in some spinach or bell peppers with the onions for a fresher take! Just keep an eye on the cooking time if you add anything extra, as we still want our beef to be perfectly browned.
Kitchen Tools You’ll Need
- Large Skillet (about 12 inches)
- Cutting Board
- Chef’s Knife
- Spatula
- Butter Knife (for spreading)
- Plate or Baking Tray (for assembly)
How to Make Ultimate Cheesy Ground Beef Melt
Let’s dive into creating this delicious Ultimate Cheesy Ground Beef Melt. I’ve broken down the process into simple steps. Follow along, and you’ll have a delicious meal in no time. We’re aiming for perfectly golden, cheesy bliss!
Sear the Beef to Savory Perfection
First, in a skillet over medium heat, cook 1 pound ground beef until browned. Drain any excess fat to prevent your melt from being greasy. The sizzling sound is music to your ears, and the smell? Heavenly.
Sauté Onions and Garlic for Flavor
Next, add 1 chopped onion and 2 cloves minced garlic to the beef mixture, cooking until the onions are softened – about 3-4 minutes. This step is key for building that flavor foundation that makes this melt unbeatable!
Stir in Worcestershire for That Umami Boost
Now, stir in 1 tablespoon Worcestershire sauce along with salt and pepper to taste. Give it all a good stir to combine! Those bits are where the deep flavor lives, elevating your melt to the next level.
Remove and Set Aside
Once the beef mixture is well-combined and fragrant, remove it from heat and set it aside. Let those flavors mingle while you prepare for the assembly!
Butter Up the Bread
Next, butter one side of each slice of 4 slices of bread. This will help achieve that coveted golden crust when we grill the melts. Don’t be shy with the butter; it’s all part of the indulgence!
Layer the Goodness
Now, on the unbuttered side of two slices, layer the beef mixture and 4 slices of cheese. Feel free to mix and match the kinds of cheese if you’re feeling adventurous! Top with another slice of bread, buttered side up.
Grill the Melts to Golden Perfection
Heat the skillet over medium heat again, and carefully place the sandwiches in, cooking until golden brown and the cheese has melted, flipping once. This will usually take about 3-4 minutes per side. The goal is that gorgeous melty goodness!
Slice and Serve Warm
Finally, slice your melts in half and serve warm. It’s best enjoyed fresh off the skillet while the cheese is still bubbling, inviting everyone to dig in!
How to Store Ultimate Cheesy Ground Beef Melt
If you find yourself with any leftovers (unlikely, but hey, it happens!), this dish holds up surprisingly well. You can store any wedge leftovers in an airtight container in the refrigerator for 3-4 days, and they also freeze excellently for about 2-3 months. Just remember to reheat them in a skillet or microwave until heated through, making them feel fresh and delicious again!
Tips for Success
- Don’t overcrowd the skillet when grilling the melts; this ensures even cooking.
- Use a good-quality cheese for the best meltability.
- Let the beef mixture cool slightly before layering to prevent soggy bread.
- Keep the heat medium to avoid burning the bread while waiting for the cheese to melt.
Serving Suggestions
- Serve with crispy French fries or sweet potato wedges for a classic combo.
- Pair with a refreshing side salad for a light contrast to the richness.
- Enjoy with a chilled soda or a light beer for the ultimate casual dinner.
- Garnish with fresh herbs like parsley or chives for a pop of color!
- Present on a rustic wooden board for a charming, appetizing display.


Leave a Comment